- VBA Excel. Свойства ячейки (объекта Range)
- Ячейка и объект Range
- Свойства ячейки (объекта Range)
- Простые примеры для начинающих
- Форматирование ячеек
- VBA Ranges — Getting and Setting Cell Values
- Getting Cell Values
- What happens if you use .Value on a set of cells?
- How do you get a single cell from a set of cells?
- The Range.Cells Function
- Setting Cell Values
- How do you set multiple cells’ values?
- Getting and Setting Cell Values from a Named Range or Table Name
- What’s next?
VBA Excel. Свойства ячейки (объекта Range)
Свойства ячейки, часто используемые в коде VBA Excel. Демонстрация свойств ячейки, как структурной единицы объекта Range, на простых примерах.
Ячейка и объект Range
Объект Range в VBA Excel представляет диапазон ячеек. Он (объект Range) может описывать любой диапазон, начиная от одной ячейки и заканчивая сразу всеми ячейками рабочего листа.
- Одна ячейка – Range(«A1») .
- Девять ячеек – Range(«A1:С3») .
- Весь рабочий лист в Excel 2016 – Range(«1:1048576») .
В VBA Excel есть свойство Cells объекта Range, которое позволяет обратиться к одной ячейке в указанном диапазоне (возвращает объект Range в виде одной ячейки). Если в коде используется свойство Cells без указания диапазона, значит оно относится ко всему диапазону активного рабочего листа.
Примеры обращения к одной ячейке:
- Cells(1000) , где 1000 – порядковый номер ячейки на рабочем листе, возвращает ячейку «ALL1».
- Cells(50, 20) , где 50 – номер строки рабочего листа, а 20 – номер столбца, возвращает ячейку «T50».
- Range(«A1:C3»).Cells(6) , где «A1:C3» – заданный диапазон, а 6 – порядковый номер ячейки в этом диапазоне, возвращает ячейку «C2».
Подробнее о том, как обратиться к ячейке, смотрите в статье: Ячейки (обращение, запись, чтение, очистка).
В этой статье мы рассмотрим свойства объекта Range, применимые, в том числе, к диапазону, состоящему из одной ячейки.
Еще надо добавить, что свойства и методы объектов отделяются от объектов точкой, как в третьем примере обращения к одной ячейке: Range(«A1:C3»).Cells(6) .
Свойства ячейки (объекта Range)
| Свойство | Описание |
|---|---|
| Address | Возвращает адрес ячейки (диапазона). |
| Borders | Возвращает коллекцию Borders, представляющую границы ячейки (диапазона). Подробнее… |
| Cells | Возвращает объект Range, представляющий коллекцию всех ячеек заданного диапазона. Указав номер строки и номер столбца или порядковый номер ячейки в диапазоне, мы получаем конкретную ячейку. Подробнее… |
| Characters | Возвращает подстроку в размере указанного количества символов из текста, содержащегося в ячейке. Подробнее… |
| Column | Возвращает номер столбца ячейки (первого столбца диапазона). Подробнее… |
| ColumnWidth | Возвращает или задает ширину ячейки в пунктах (ширину всех столбцов в указанном диапазоне). |
| Comment | Возвращает комментарий, связанный с ячейкой (с левой верхней ячейкой диапазона). |
| CurrentRegion | Возвращает прямоугольный диапазон, ограниченный пустыми строками и столбцами. Очень полезное свойство для возвращения рабочей таблицы, а также определения номера последней заполненной строки. |
| EntireColumn | Возвращает весь столбец (столбцы), в котором содержится ячейка (диапазон). Диапазон может содержаться и в одном столбце, например, Range(«A1:A20») . |
| EntireRow | Возвращает всю строку (строки), в которой содержится ячейка (диапазон). Диапазон может содержаться и в одной строке, например, Range(«A2:H2») . |
| Font | Возвращает объект Font, представляющий шрифт указанного объекта. Подробнее о цвете шрифта… | HorizontalAlignment | Возвращает или задает значение горизонтального выравнивания содержимого ячейки (диапазона). Подробнее… |
| Interior | Возвращает объект Interior, представляющий внутреннюю область ячейки (диапазона). Применяется, главным образом, для возвращения или назначения цвета заливки (фона) ячейки (диапазона). Подробнее… |
| Name | Возвращает или задает имя ячейки (диапазона). |
| NumberFormat | Возвращает или задает код числового формата для ячейки (диапазона). Примеры кодов числовых форматов можно посмотреть, открыв для любой ячейки на рабочем листе Excel диалоговое окно «Формат ячеек», на вкладке «(все форматы)». Свойство NumberFormat диапазона возвращает значение NULL, за исключением тех случаев, когда все ячейки в диапазоне имеют одинаковый числовой формат. Если нужно присвоить ячейке текстовый формат, записывается так: Range(«A1»).NumberFormat = «@» . Общий формат: Range(«A1»).NumberFormat = «General» . |
| Offset | Возвращает объект Range, смещенный относительно первоначального диапазона на указанное количество строк и столбцов. Подробнее… |
| Resize | Изменяет размер первоначального диапазона до указанного количества строк и столбцов. Строки добавляются или удаляются снизу, столбцы – справа. Подробнее… |
| Row | Возвращает номер строки ячейки (первой строки диапазона). Подробнее… |
| RowHeight | Возвращает или задает высоту ячейки в пунктах (высоту всех строк в указанном диапазоне). |
| Text | Возвращает форматированный текст, содержащийся в ячейке. Свойство Text диапазона возвращает значение NULL, за исключением тех случаев, когда все ячейки в диапазоне имеют одинаковое содержимое и один формат. Предназначено только для чтения. Подробнее… |
| Value | Возвращает или задает значение ячейки, в том числе с отображением значений в формате Currency и Date. Тип данных Variant. Value является свойством ячейки по умолчанию, поэтому в коде его можно не указывать. |
| Value2 | Возвращает или задает значение ячейки. Тип данных Variant. Значения в формате Currency и Date будут отображены в виде чисел с типом данных Double. | VerticalAlignment | Возвращает или задает значение вертикального выравнивания содержимого ячейки (диапазона). Подробнее… |
В таблице представлены не все свойства объекта Range. С полным списком вы можете ознакомиться не сайте разработчика.
Простые примеры для начинающих
Вы можете скопировать примеры кода VBA Excel в стандартный модуль и запустить их на выполнение. Как создать стандартный модуль и запустить процедуру на выполнение, смотрите в статье VBA Excel. Начинаем программировать с нуля.
Учтите, что в одном программном модуле у всех процедур должны быть разные имена. Если вы уже копировали в модуль подпрограммы с именами Primer1, Primer2 и т.д., удалите их или создайте еще один стандартный модуль.
Форматирование ячеек
Заливка ячейки фоном, изменение высоты строки, запись в ячейки текста, автоподбор ширины столбца, выравнивание текста в ячейке и выделение его цветом, добавление границ к ячейкам, очистка содержимого и форматирования ячеек.
Если вы запустите эту процедуру, информационное окно MsgBox будет прерывать выполнение программы и сообщать о том, что произойдет дальше, после его закрытия.
VBA Ranges — Getting and Setting Cell Values
In the previous post, we introduced the VBA Range object. This gave us the foundation of working with Ranges in VBA. In today’s post, I’d like to discuss how to get and set cell values through VBA. This will continue to build up our understanding of the VBA Range object and how to use it. There are several ways you can get and set cell values with VBA and I’ll do my best to cover all the necessities, but at the same time keeping it short and to the point. Let’s get started.
Getting Cell Values
To get a cell’s value in VBA, we need to refer to it with the Range object and then call the .Value property.
We’ll use the following spreadsheet for our example. It’s a simple table with some names in it.
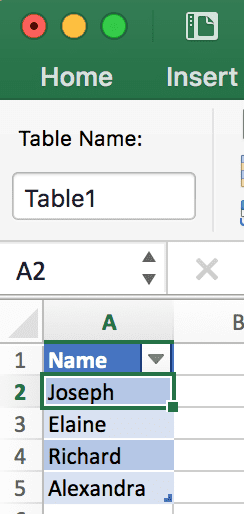
To get the value from cell A2 you can use this code snippet:
This will take cell A2 and put it in the variable val . Then we print out the value in the Immediate Window (which the value in our example is Joseph ).
You can also set the range to a variable and access the value from that variable as well:
What happens if you use .Value on a set of cells?
Let’s change our previous code snippet to the following:
If you run this code, you will get an error stating that there is a type mismatch.
What’s going on here?
The problem is that when you work with a set of cells, .Value can only return a single value. So when we ask VBA to return .Value on our variable (which refers to multiple cells), the .Value property doesn’t know which cell we are referring to.
How do you get a single cell from a set of cells?
In order to use .Value to get a value from a cell, we need to refer to a single cell from the range of cells in our variable. The way we do that is with the Cells() VBA function.
The Range.Cells Function
The Cells() function is a way to take a range of cells and return a single cell from the set. Here is the function defined:
| Parameter | Type | Definition |
|---|---|---|
| row_number | Integer | The row number from within the range that you want to refer to. |
| column_number | Integer | The column number from within the range that you want to refer to. |
Take a look at the following code:
Here we took the range of A2:A5 and referred to row 1 column 1. Since the range variable cellRange refers to A2:A5 , the first row is row 2 and the first column is A .
When using the Cells() function, remember that row 1 and column 1 represent the top-left most cell within the range that the Cells() function is working on. If your range is A1:D5 , then Cells(1, 1) will refer to A1 , but if your range is B2:D6 , then Cells(1, 1) refers to B2 .
Ok, that covers getting cell values from range objects, now let’s discuss setting cell values with range objects.
Does this article help you? If so, please consider supporting me with a coffee в•пёЏ

Setting Cell Values
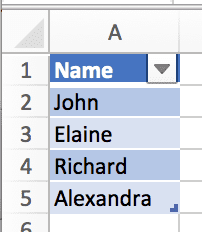
In order to set a cell’s value, you can use the same .Value property when referring to a cell. In this example, we’ll take A2 ’s value and change it from Joseph to John :
First we set the variable cellRange to A2 . Then we said cellRange.Value = «John» which changes the variable’s .Value property. Remember, though, that the variable is a reference to cell A2 , so whatever you do to that variable, you also do to cell A2 in the worksheet. Finally, we output the value of A2 into the Immediate Window to see that it changed.
We can also see the value changed in the worksheet after we run this code:
How do you set multiple cells’ values?
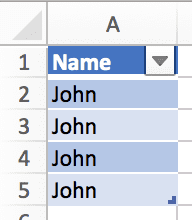
Remember how I said that you can only read from one cell using .Value ? Well, when setting values, you can actually set multiple cells at one time by using .Value . Take a look at the following code:
If you ran this code, it would set all A2:A5 ’s cells to John :
Well, maybe you’d actually want to do this for some other scenarios, like when you want a bunch of cells to repeat a value.
Let’s take a real example for a second. Let’s say we have two columns, First Name and Last Name . We want to take the Last Name column and place its value after the First Name ’s value; essentially combining the values to make a single Name column.
Here’s our sample data:
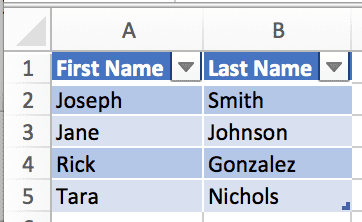
Our task is to combine the first and last name columns and place the result in column A . How do we do that?
One solution is to loop through cells A2 through A5 and then set that cell’s value to its own value, plus a space, plus the last name of the cell right next to it.
Sounds easy enough, let’s code it up:
Let’s step through the code.
- First, we create a variable called names . Then, we set that to range A2:A5 .
- Next, we create a variable called cell . This is going to be a temporary variable that will change with each iteration of the loop.
Then, we create the loop. Here, we’re looping through the names range object and setting the current item to the cell variable. This means that each time we run through the loop, cell represents a single range object.
*The first time the loop is run, cell is set to A2 . Then, A3 , next A4 , and finally A5 . After that, there are no more cells to go through in the names variable, so the loop ends.
- I’ll go over how to loop through ranges in a future post since this post is already long enough!
Now we’re ready to combine the first and last names. How we do that is with another Range function called Offset(_rows_, _columns_) . The idea with this function is that if you’re on a cell like A2 and you say cell.Offset(0, 1) what we’re really saying is “move over one column to the right”. This puts us on cell B2 . That’s how we’re able to get the last name in our example.
- I’ll discuss how to use the Offset() function in more detail in a future post. Again, this post has gone on long enough.
Here are the results of the code after we run it:
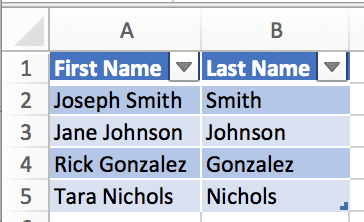
From here, we could change the A1 cell to just Name and delete column B altogether.
Getting and Setting Cell Values from a Named Range or Table Name
One last thing I’d like to touch on is when you use the Range() function, you can use a named range or table name instead of a range like A2:A5 . In our first example, our data is in a table named Table1 . To refer to the data of the table, we could use the following:
And to refer to the entire table, we can leverage structured referencesВ like so:
This will return A1 ’s value “Name” since the table starts in A1 .
Also, if you’re new to Excel Tables, click here to learn more.
What’s next?
Honestly, there is so much to discuss with range objects in VBA. I’ll be touching on many more topics regarding ranges in VBA in upcoming posts such as:
- Modifying cell colors
- Finding cells by their text values
- Filtering data
- Getting the last row in a range (you need this more often than you think)
I’ll come back to this post and put links to these posts as I create them.
If you enjoyed this content, please share and subscribe!
Wow, you read the whole article! You know, people who make it this far are true learners. And clearly, you value learning. Would you like to learn more about Excel? Please consider supporting me by buying me a coffee (it takes a lot of coffee to write these articles!).
Written by Joseph who loves teaching about Excel.
