- Как собрать Фишер Куб и его модификации
- Наглядные видео инструкции для начинающих на тему, как собрать кубик Фишер Куб и его модификации
- Название головоломки и идея
- Отличие головоломки Фишера от Рубика
- Как собрать Фишер куб
- Как собрать куб Фишера обучающее видео для новичков
- The Fisher Cube
- Notation
- Overview
- Cross
- White Corners
- Remainder of F2L
- Parity
- OLL and PLL
Как собрать Фишер Куб и его модификации
Что из себя представляет головоломка Фишер Куб и как её собрать?
Это немножко необычная головоломка, так как в ее основе лежит кубик Рубика 3х3. Иными словами это шейпмод кубика 3 на 3. Модификация которая не похожа по форме, но по сути решается точно так же. Поэтому, если вы умеете собирать кубик 3 на 3, вам будет достаточно перестроить восприятие этой головоломки по форме, и у вас всё получится.
Наглядные видео инструкции для начинающих на тему, как собрать кубик Фишер Куб и его модификации
Название головоломки и идея
Данная игрушка названа в честь своего изобретателя Тони Фишера (Tony Fisher).
Идея Тони заключалось в том, чтобы повернуть элементы классического кубика Рубика на сорок пять градусов, относительно вертикальной оси. После чего, элементы головоломки “нарастили” так, чтобы её форма была кубической. Вот так и родилась новая головоломка.
Кубик Тони Фишера 3 на 3 производится из качественного пластика со стикерами или из цветного пластика.
Отличие головоломки Фишера от Рубика
Fisher Cube немного сложнее кубика Рубика 3 на 3, так как он немножко метаморфозер и умеет менять свою форму.
При сборке могут возникнуть некоторые затруднения, так как на нем бывают паритеты. Паритеты, это ситуации когда два элемента куба нужно поменять местами, не затрону остальные элементы.
Фишер Куб культовый атрибут в коллекциях головоломок многих спидкуберов. Все потому, что данная головоломка является основополагающей в разработке других шейпмодов кубика 3 на 3.
Как собрать Фишер куб
В данном материале, речь пойдет о том как собрать кубик Рубика — Фишер куб, схеме, формулам и алгоритме сборки.
В самом конце нашей статьи вы найдете видео с подробным описанием метода сборки куба Фишера!
Данная головоломка из серии «разновидностей кубика Рубика«, которая называется кубик Фишера, или Фишер куб (названная в честь изобретатель).
Этот кубик всего-навсего на 11 лет младше своего старшего брата, но алгоритмы остаются те же (правда есть один паритет, но о нем чуть позднее).
При вращении Фишер куба он теряет свою «квадратную» форму и превращается в пугающего монстра.
Вот так выглядит перемешанный куб Фишера:
Как я писал выше, алгоритм для сборки Фишер куба такой же (за исключением двух пунктов), как и для сборки кубика Рубика 3х3.
Сначала собираем верхний крест. Здесь может возникнуть первая заминка, потому что в кубике 3х3х3 можно начинать собирать с любого цвета, в кубе Фишера собирать можно только два цвета (в моем случае это красный и оранжевый). То есть те детали Фишер куба у которых центральные элементы являются квадратами и их нельзя вращать.
И еще одна важная деталь, в кубике Фишера — реберные и угловые элементы поменяны местами (если сравнивать с кубиком Рубика 3х3), то есть реберные элементы имеют три цвета, а угловые элементы только два цвета.
И так, первый шаг сборки Фишер куба, собираем верхний крест:
Следующий (второй) шаг сборки Фишер куба — собираем (правильно сказать ориентируем) угловые элементы под верхним крестом.
Это очень просто, потому что все угловые элементы Фишер куба стоят на своих местах, их нужно только повернуть на 90 или 180 градусов.
Третьим шагом сборки Фишер куба – мы ставим на места угловые элементы в первом слое (там, где уже есть крест).
Все делается схемами, как и в кубике 3х3 – отвели в сторону необходимый элемент, подвели место, куда он должен встать и ставим на место.
Первый слой на Фишер кубе уже собран:
Четвертым шагом сборки Фишер куба будет — сборка второго слоя.
Следующая задача собрать второй слой Фишер куба – здесь нам нужно поставить на свои места четыре центральных элемента (имеющих только один цвет).
Это может звучать немного странно, потому что в кубике 3х3 центральные элементы не двигаются, а в кубе Фишера четыре из шести центральных элементов подвижны.
Но опять же центральные элементы мы ставим по формуле из 3х3, которую нужно использовать при сборке второго слоя.
Второй слой Фишер куба собран!
Пятым шагом сборки Фишер куба будет — ориентация реберных элементов последнего слоя.
На следует, правильно сориентировать четыре реберных элемента последнего слоя.
Здесь может возникнуть один паритет, которого нет в кубике 3х3.
Если один, или три элемента ориентированы неправильно, тогда мы использует вот эту формула – F U’ F’ U L’ U2 LU L’ U2 L
В ситуации когда четное элемента Фишер куба ориентировано неправильно, то используем формулу — FRU R’ U’ F’ (это формула из 3х3).
На фото пример ситуации с паритетом:
А на фото ниже, показана ситуация без паритета:
Фишер куб на котором уже сориентированы реберные элементы верхнего слоя (фото):
Шестым шагом сборки Фишер куба — мы поставим его реберные элементы на свои места (капитан очевидности говорит, что формулу берем из алгоритма сборки кубика Рубика 3х3 ).
Далее мы ставим угловые элементы Фишер куба на свои места:
И последним шагом в сборке Фишер куба — мы ориентируем угловые элементы.
Куб Фишера собран!
Существуют и другие варианты сборки Фишер куба (вероятно быстрее, с меньшим количеством движений).
Для начала, вы можете собирать Фишер куб по схемам для начинающих. Это если Вам ленюсь учить большое количество формул, которые используют в спидкубинге.
Узор на Фишер кубе — «Диагональный» куб Фишера.
Как собрать куб Фишера обучающее видео для новичков
Из-за того что элементы Фишер куба имеют разную форму, то в разобранном виде кубик выглядит очень сложным и пугающим.
На самом деле все очень и очень просто. Для начала найдем белый центр на кубе Фишера точно так же как и на кубике 3х3. Белый и желтый центры, и в этой головоломке нормальные квадратные и одноцветные, ничего необычного. Как и в обычной тройке (кубике 3х3) сначала собираем крест и рёбра. Потом все так же как и на кубике Рубика 3х3.
Смотрим видео и получаем ответы на свои вопросы.
The Fisher Cube
The Fisher Cube is one of the best known 3×3 shape modifications in existence. Invented and named after by famous puzzle inventor Tony Fisher. It was invented sometime during the 80s, inspired by the original Rubik’s Cube. The puzzle has a very similar solving method to a 3×3, so make sure you can solve that using at least the beginner’s method before you tackle the Fisher Cube.

The Fisher Cube among other modified 3x3s’
Notation
The Fisher Cube is a strange puzzle and can take some time to get used to if you’re not familiar with anything beyond standard NxN puzzles such as the original Rubik’s Cube. The puzzle has the exact same notation as standard puzzles; using letters to define face turns, such as:
R – A clockwise quarter turn of the right face.
R’ – An anti-clockwise quarter turn of the right face.
R2 – A half turn of the right face in either direction.
If you need further clarification for this standard notation, check the Rubik’s Cube Notation here.
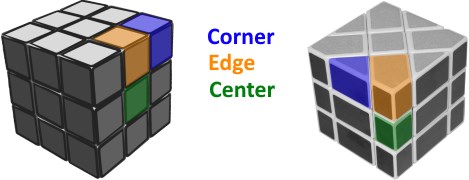
Despite using the exact same notation, the Fisher Cube has slightly different definition of edges, corners and centres. Below are pictures of a standard Rubik’s Cube and a Fisher Cube with arrows pointing out the centre, edge and corner pieces on each puzzle. This is important to understand fully how the puzzle functions and what the differences are when solving it.


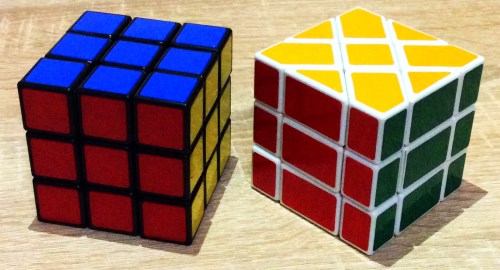
A Rubik’s Cube compared to its shape-mod, the Fisher Cube
These differences in piece labelling are vital for being able to correctly solve the Fisher Cube. The two images above were chosen specifically as they both show the puzzle from a face-on perspective. The red-green centre piece on the Fisher cube related to the red centre piece on the normal puzzle. From both these positions, it is easy to see how a R move would be made (the right-most layer on the standard puzzle and the triangular shaped right-most section of the Fisher cube). Keep this similarity in mind when solving the puzzle.
Also, as a side note, there is only one type of edge on a standard 3×3 – a two coloured piece that fits between two corners and two centres of the puzzle. On the Fisher Cube, there are two different types of edge piece – Three-coloured house-shaped pieces that look like they should be the corners, and one-coloured rectangular pieces that look like they should be centre pieces. This will be important during the solving phase.
Overview
Here is an overview of the steps required to solve the Fisher Cube:
- White Cross (with correct centre orientation)
- White corners
- Remainder of F2L (first two layers)
- Parity correction (if necessary)
- OLL and PLL
This solution has a few key differences to that of a standard Rubik’s Cube. These will be detailed in each step’s tutorial section. Parity only occurs 50% of the time, so keep in mind that you might not always have it.
Cross
This section will only be briefly explained as you should be familiar with the 3×3 beginner’s method, and therefore familiar with the concept of building the cross. The Fisher Cube has two solid one-colour centres (usually white and yellow, but these centres are whatever your top and bottom faces are when the puzzle is solved). For this tutorial, we will use the white centre and thus a white cross. The top and bottom faces have four of the aforementioned house-shaped pieces connected to them when the puzzle is solved. You must build the cross so that you have an X shape of cross pieces that are attached to their corresponding centres (remember that the centres on the Fisher cube are the two-coloured pieces that look like 3×3 edges). Don’t worry about centre orientation just yet, just make sure that, for example, the white-orange-green edge is connect to the orange-green centre piece.
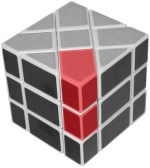
Once all four cross pieces have been inserted, you can correct the orientation of the centres. On a 3×3, each centre only has one colour, so the orientation doesn’t matter. However, with the Fisher Cube, the four middle-layer centres have to be orientated correctly or the puzzle will not appear solved. To check to see if a centre is correctly oriented, look at one of the cross pieces. The two-coloured centre should be vertically attached to the edge so it makes a solid bar (see the picture below).

White Corners
The corners on the Fisher Cube are the small two-coloured triangular located between the house-shaped edges on the top and bottom of the puzzle. This means that you can solve them in the exact same way that you would using R and D moves in the beginner’s method. If you can solve this stage on a standard 3×3, then this stage should be relatively easy – Just place the corner beneath its position and repeat the algorithm R’ D’ R D until it is solved.
Remainder of F2L
Solving the remainder of the first two layers involves attaching the rectangular one-coloured edge pieces to their respective corners. This can be done in a similar way to the edge insertion on a standard 3×3 to complete the second layer. Since the edges are one-coloured, it doesn’t matter if you perform either the F2L Right or F2L Left algorithms (see the beginner’s method if you are unsure of what these algorithms are), however we will stick to using just one of these algorithms for this section. Look at the position where the edge needs to go (we’ll call this the target), and place the edge that you want to solve over the centre piece that is to the left of the target. Hold the puzzle so the edge you want to solve is facing you directly, then perform the F2L Right algorithm – U R U’ R’ U’ F’ U F.
Repeat this step for all four one-coloured edge pieces to complete the first two layers
Parity
It’s possible on this cube in a similar way to a 4×4 puzzle parity, but for different reasons. On a standard Rubik’s Cube, when the first two layers are solved correctly, there are three different numbers of oriented edges on the top layer – 0, 2 and 4. This is because you cannot flip a single edge, therefore if every other edge is solved, then the number of oriented edges must be even. On the Fisher Cube, however, you could end up with any number of edges oriented. If you have an odd number oriented (1 or 3), then you have parity. Remember, these are the house-shaped pieces, as we are dealing with the top layer edges.
This parity is the result of the previous stage. On a 3×3 you have to insert each of the F2L edges in the correct orientation, or they will be noticeably flipped. With a mono-coloured edge piece, you can’t tell which way around it has to go. If you have an odd number of edges oriented on the top layer, you also have an odd number of edges oriented in the middle layer. To fix this problem, simply flip one of the middle layer edges. This will rebalance the number of oriented edges in the middle layer, thus resulting in fixed parity. Think of the piece in the middle layer as being in the position shown below on the standard puzzle. This is obviously visible on the 3×3 because there are two colours, but with only one colour on the edge, you can’t tell which is the right way.

R U R’ U2 R U2 R’ U F’ U’ F
This will flip one of the middle layer edges in its place, resulting in an even number of oriented edges on the top layer.
OLL and PLL
Once any potential parity has been fixed, the rest of the cube is solved exactly the same as a standard 3×3 puzzle. It is recommended that you use OLL and PLL algorithms to solve the remainder of the puzzle. This involves orienting all four edges, then orienting the four corners, then permuting the pieces to finish the cube. Please remember that the corners and edges are “swapped” on a Fisher cube, so the house-shaped pieces are actually edges and the two-coloured triangular pieces are actually corners. This is important as some cases may appear to be different cases if you don’t remember this. An example of this is the E permutation. On a 3×3, an E permutation means that all of the edges are solved and none of the corners are. Because the edges on a Fisher Cube look like corners, an E permutation looks like a Z permutation at first glance.

