How to work with a muted mouse
Many games detect mouse as is and that is why it is important to mute it to cancel the native behavior. However, you may get troubles navigating your PC when the mouse is completely off. Here are a few options you may use.
1. Use Shift mode
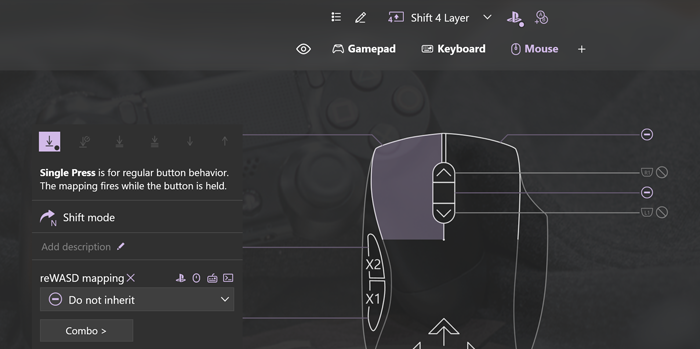
Shift is an additional layer in your config that is activated when you Jump to Shift. To make your mouse active in Shift, follow the steps below:
- Go to any Shift layer you do not use
- Choose Do not inherit for important mouse buttons
- Do not add any mappings to Mouse directions or remove the ones you have
- Choose a control that will work as Jump to Shift. If you grouped your mouse with keyboard, it is a good idea to set it on the keyboard
- Use Toggle mode for the Jump to Shift key if you want your mouse to be active after the first tap on this buttons. Otherwise, you will need to press and hold a Jump to Shift key to enter Shift layer
- Press Apply and try how Shift works
2. Use Slots
Slots allow you to apply up to 4 configs simultaneously and switch between them using the customizable hotkey. You can also swtich to an empty Slot that returns your device to the normal state:
- Click Preferences — an icon at the bottom right corner of the main window
- Switch to Slots tab
- Choose a mouse or a group with a muted mouse in Use hotkeys to switch slots for list
- Set custom two-button or three-button hotkey
- Press Apply to Slot
- Get back your config and apply it to the the chosen Slot
- After the config is applied, this slot will be activated. Now press your hotkey to switch to the empty slot — your mouse is back.
- Enter the game
- Press another hotkey to activate the slot with a muted mouse
3. Use Autodetect
With Autodetect, reWASD applies configs automatically when you switch to the associated app. Using it, you can choose the specific game in which the mouse is remapped and muted, while in all other ones, the mouse will work as usual:
- Click Preferences — an icon at the bottom right corner of the main window
- Switch to Tray agent tab
- Check Remove applied config from slot on exit from the associated app option
- Go back to your config
- Check Radar icon in the lower-left corner of the main window
- Add .exe file you want to associate a config with
- Press Save
- The Radar icon is now highlighted, which means that Autodetect is active and the config will be applied once one of the associated apps is in focus
4. Emergency stop
In case you need to get your mouse back immeditaly, switch remap off using Ctrl+Alt+Delete hotkey. It should be pressed on your physical keyboard. This hotkey removes all applied configs from all connected devices.
Advanced Stick settings
Advanced Stick settings are fully adjustable with Advanced Mapping feature or its trial, some important settings are available with the Basic license or its trial. Xbox Elite controllers are an exception, and some of the Advanced Mapping functionality is available for this particular controller with the Basic License.
Here is a list of Advanced Stick settings:
Mute — turns off the native stick behavior completely. This feature is available if the Advanced Mapping feature is purchased, or if the trial period is active. Useful for the case when you want to assign keyboard keys or mouse moves to the stick, and need to mute the controller input. Once you activate this, Stick Response, X and Y Invert and Hardware Deadzone become inactive.
Rotation — permits to set the angle for your stick. The possible range to rotate the stick is -45°..45°, so if you wish to rotate the stick more, consider inverting the axes or swapping mappings.
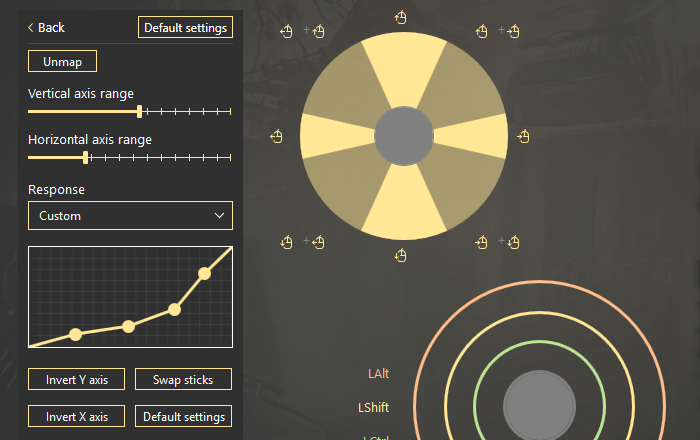
Vertical and Horizontal axis range — permits tuning the range where directional mappings reproduce exclusively, or together. This feature is available if the Basic license is purchased, or if the 7-day trial is active. The further to the right those sliders are, the less transitional movements will reproduce.
As an example, let’s say you have set WASD to the stick, and maximize both Horizontal and Vertical axis range. You can see that the W+A, A+S, S+D and W+D movement range is tiny, that means that while you move the stick, W, A, S and D will mostly reproduce exclusively. So a character in the game will run straight forward, left, etc. On the contrary, if you minimize both Horizontal and Vertical axis range, the stick will more likely reproduce as W+A, A+S, S+D, and W+D then W, A, S and D separately.
Use 8 digital directions — converts the stick to the digital mode, and permits you to assign mappings to 8 directions. You can assign the mapping for up, down, left and right directions from the Main mappings menu, and set the remaining diagonal mappings in Advanced stick settings menu.
To set the mappings to diagonal directions, choose the needed Direction from the drop-down list, then add a mapping To it. You can assign key combos to diagonal moves as well.
Please note, that Vertical and Horizontal axis range has impact on a digitalized stick.
Stick Response — changes the way the stick behaves. reWASD proposes 6 profiles (Default, Delay, Aggressive, Instant, Smooth, and Custom) that differ with the stick response curve. All profiles, except Custom, are available for Xbox Elite controller by default. All 6 profiles, including Custom, are available for the Advanced mapping feature owners. Default Stick Response profile is the only one available for Basic license.
Note, that Custom profile gives an opportunity to modify the curve with four dots you can move. There’s a graph that demonstrates the details of existing profiles so you could see what profile is the best to choose. Remember, that Y-axis of this graph is Cursor speed, and X-axis is the line of Stick deflection: from the resting state to the maximum.
You can Copy, Paste and Clear curve settings. To do so, right-click the graph, then choose the relevant option.
Invert Y and X axis — inverts the axis of a chosen stick. Available with Advanced Mapping feature, and for Xbox Elite controllers.
Swap Sticks — replaces left stick with a right stick, and vice versa. Available with Advanced Mapping feature, and for Xbox Elite controllers. Works both for keyboard and mouse mappings, and for controller ones.
Default settings — turns your stick back to default settings. Available with Basic license, or with a 7-day trial.
Stick Zones — changes the Deadzone, Low, Medium and High zones, and permits adding mappings to them. Learn more about Stick zones.
After you are done, click Back on the top of the left list of settings to return to the main view. Click Default settings to reset the stick to the default state.
Flick Stick
Since reWASD 5.8, we have implemented the Flick Stick functionality, originally created by Jibb Smart. It is a mode where your stick acts as a mouse, and allows you to instantly turn your character to any point of a 360-degree analog stick. It works best in conjunction with the Gyroscope, that will act as Y axis, while Flick Stick takes care of X axis.
Keep in mind, that Virtual mouse settings do not affect Flick Stick
To enable Flick Stick on your controller, follow these steps:
- Choose a controller you want to use (a gamepad with gyro is preferable)
- Create a new config, or choose an existing one
- Choose any direction of a Right stick (or the Left Stick), and click Flick Stick
- You’ll see several settings you need to configure for each game individually:
- X Sensitivity is the mouse sensitivity parameter
- Threshold defines at what point of stick deflection the flick will fire
- Smoothing makes Flick Stick less jittery
- Duration is the amount of time each flick would take
- If you wish to use Flick Stick along with Gyro, make sure to add the mappings to Gyroscope too: choose Gyro or Tilt mode, add mouse moves to Y axis, add some Commands to manage gyro
- Assign additional binds, and you’re good to go
X Sensitivity is the parameter you, most likely, will spend the most time tuning. The main task for you here is to find the X Sensitivity value that will make a full circle on your physical stick also a full circle for your character’s field of view in game. Eventually, you should be able to flick the stick to a certain angle, and that’s where your character will turn instantly (in Duration time).
Advanced Mouse settings
Advanced mouse settings tune how the mappings emulated for physically moved mouse work. When there is nothing mapped to mouse directions, Advanced settings are disabled. Advanced mouse settings are available if the Advanced Mapping feature is purchased, or if its trial period is active.
It’s important to understand, that sticks do not work like mouse does. To turn the character from side to side quickly, you need to hold the stick for some time at the maximum point of deflection. Which, in case of mapping the stick to physical mouse, is equal to slowly, but consistently, moving it in a certain direction.
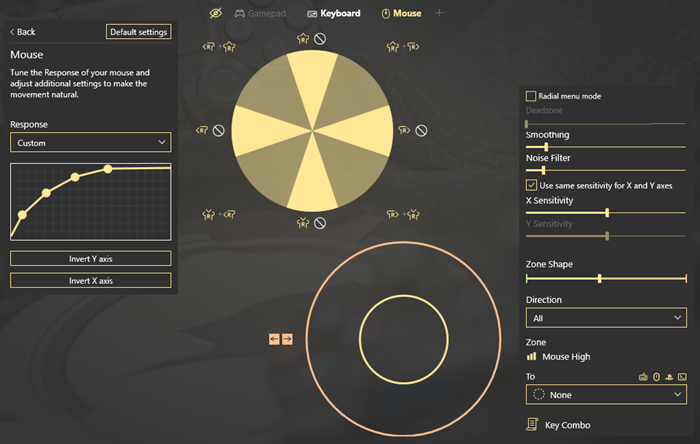
To tune mappings on mouse moves, switch to mouse sub-config, choose directions on mouse image and click Advanced. You will be redirected to the page with the following options:
Response curve applies for the virtual stick: Y-axis of this graph is the intensity of stick deflection, and X-axis is the path from the resting state of the virtual stick to the maximum. For example, if you want map a virtual stick to the physical mouse and want to make slow moves but still get some virtual input, it is better to lift the first point on the curve.
To increase the starting input for the Virtual stick, you need to head up to Virtual Controller settings and change the Deflection range for the chosen stick.
You can Copy, Paste and Clear curve settings. To do so, right-click the graph, then choose the relevant option.
Invert Y axis and Invert X axis swaps the mappings added to up/down and left/right directions.
In Default mode, mappings will stop when there is no movements. When you turn on Radial Menu mode, you will need to move mouse to the Deadzone to stop mappings.
Smoothing is available for Default mode only. Increase this option to make mouse movements smoother but a bit less responsive.
Noise Filter is available for Default mode only. It sets the quantity of null answers we should get from your mouse in order to stop it. Increase this option if your mouse stops accidentally while is moved slowly. Decrease it if you feel that your mouse is not responsive.
Sensitivity shows the correspondence between display’s dots your mouse travelled and the intensity of mappings you will get. You can adjust X and Y Sensitivity separately. It is a good idea for games where you need to move from one side to another quickly but do not need to look at top or bottom pretty often.
Starting with reWASD 5.4, you can assign mappings to Mouse High zone while in Default mode. This will help to perform fast turns.
Basically, when your mouse reaches the High zone (the size of which is adjustable), you can execute the combo that will help the mouse move be more natural.
First, adjust the size of the zone the way you need, and assign the combo to mouse directions. You can pick directions one by one, which means, you can set one type of combo for Mouse Left, and another type of combo for Mouse Right (also for Mouse Up and Mouse Down).
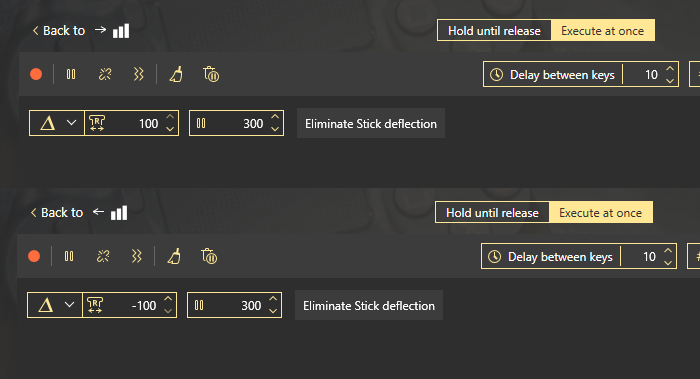
The default config in reWASD currently has these combos mapped to High zone (right and left, responsively):
We recommend to use Relative Deflection for this particular case. You can test it in game and figure out what combo would be better for you personally.
Zone shape permits you to define the shape of the High zone on mouse.
Direction drop-down list permits choosing the direction where to assign the mappings to. You can assign one mapping to all 4 directions, or pick each of them and bind mapping to them separately.
Now, you can remap a chosen Zone. Pick the mapping that you assign To it in reWASD mapping list below, or use the Key Combo editor.
After you are done, click Back on the top of the left list of settings to return to the main view. Click Default settings to reset the mouse to the default state.
Remapping mouse
Remapping a standard mouse
If you have a standard mouse without additional buttons, follow these steps to remap the mouse:
- Download and install reWASD
- Launch reWASD and make sure that your mouse is connected to the PC
- Choose the mouse (or a group of devices that includes mouse) you want to remap in the Device list
- Create a new profile by clicking the Plus sign at the bottom of the Profile list: set the name of a game, add a background picture if needed, and click Add. The config is created automatically
- Pick Mouse in the menu on the top of reWASD window
- Add some mappings: choose the key you want to remap, and then add a mapping to it. Repeat until you add all the desired mappings
- Once you’re done, press Save if you want to keep the changes, or press Apply if you want to try the config right away. When you press Apply the config is saved automatically
- Once the config becomes active, you will see Remap is ON in the bottom left corner. To eliminate the active config, press Remap is ON button, and you will see the Remap is OFF indicator. Press it once again to switch remap back ON.
Remapping mouse scrolls
Since reWASD 5.5.1, we have added an option to remap scroll wheel. To do that, please open Mouse sub-config, pick one of the Scroll directions, and assign the desired mapping to it. You can configure the following settings:
- Scroll delta is the setting that defines the relation between the intensity of scrolls you perform on a physical mouse, and the output you get. This slider lets you choose how long a single scroll will be. The bigger value you choose, the fewer mappings you will get when you scroll once. Each mouse has different characteristics, so we recommend testing it in game first, and this way define the sweet spot.
For example, let’s say you perform the same move with the minimum Scroll delta value, and the maximum Scroll delta value. In the case with the minimum value, the mapping may fire from 6 to 10 times. In the case with the maximum value, and making the same move (same speed and intensity), the mapping will fire 1 time.
- Use the same value for all directions permits setting different Scroll delta values for different directions.
- reWASD mapping is where you need to assign the mapping. Don’t forget that you can filter the mappings by clicking on the icons of Keyboard, Mouse, Controller, Commands.
- Mute mutes the native behavior of a scroll.
- Key Combo allows you to assign a combo to the scrolls.
Remapping a mouse with programmable buttons
If you have a gaming mouse with additional programmable buttons, it may be reported to reWASD as an unknown device.
Note, that some devices (for example, Logitech G502 or G300S) have On-Board Memory option in the native software, which is set by default. That is the option you need to make your mouse cooperate with reWASD properly.
If you use a Corsair mouse with additional buttons, it may be reported as several devices to reWASD. One of them allows you to remap the main (basic) mouse buttons, like LMB, RMB, MMB and two side mouse buttons. If you have more than those five buttons on your physical mouse, they may show up as a separate device in reWASD. To check that, use Detection mode, and click the specific additional mouse buttons you wish to remap. Use the highlighted device in reWASD to remap those additional mouse buttons.
To initialize the mouse and add the mappings to it, you need to do the following:
- Download, install reWASD, and also install the native software for your particular mouse (I have an example with Bloody A6 mouse and Bloody6 software)
Now open the button mapping section in the native software of your mouse. Since reWASD can map Left mouse button, Right mouse button, Middle mouse button, X1 and X2 (two buttons that your mouse usually has at the side), you need to assign some keyboard keys to all other mouse buttons. I will map 1 to Z, N to X and 3 to C, the keys that you choose to map are up to you:
Launch reWASD and make sure that your mouse is connected to the PC
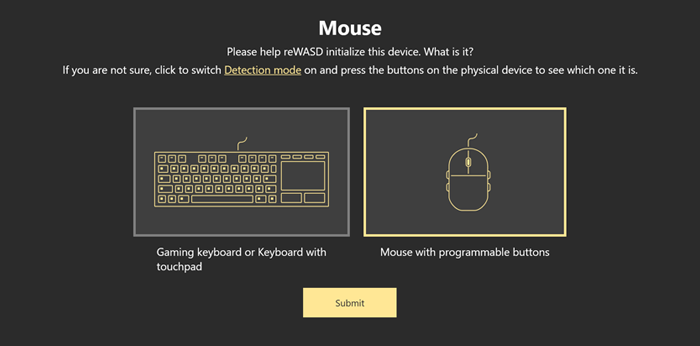
Check the lower left corner, find the icon with a question mark and click on it. You will see the following window:
Pick the relevant option, and press Submit. Now you can add mappings to it
Keep in mind, that if remap does not work properly, there is a chance that the mouse was not initialized properly. You can start from scratch and re-initialize it: open Preferences — General, and click Clear data. Then, make sure to use Detection mode to make a right choice.
Choose the mouse (or a group of devices that includes mouse) you want to remap in the Device list
Create a new profile by clicking the Plus sign at the bottom of the Profile list: set the name of a game, add a background picture if needed, and click Add. The config is created automatically
Pick Mouse in the menu on the top of reWASD window
You will see the table, now press Add to create the new mapping. Don’t forget to Mute the additional buttons too, to prevent unwanted actions. I will choose Z, X, and C at the left part and assign some combos to them in the right part:
Once you’re done, press Save if you want to keep the changes, or press Apply if you want to try the config right away. When you press Apply the config is saved automatically
Once the config becomes active, you will see Remap is ON in the bottom left corner. To eliminate the active config, press Remap is ON button, and you will see the Remap is OFF indicator. Press it once again to switch remap back ON.
